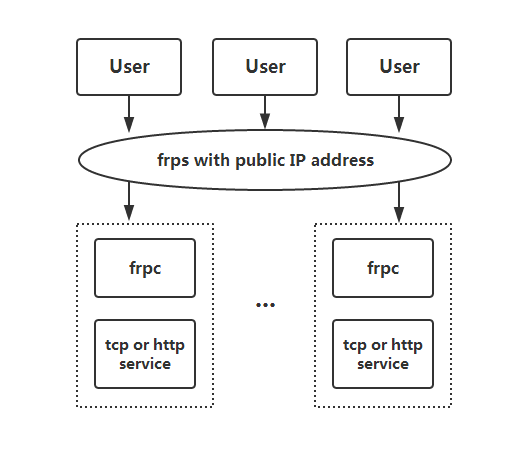
目前租了台云服务,因为家里电脑24小时开机,所以闲着也是闲着就部署了个博客。
准备阶段 下载frp frp下载地址frp 。 看好你电脑对应的架构及操作系统就行了,我这里下的是 版本 0.54.0 。
购买域名并备案 我是在腾讯云购买并备案的,详见域名注册
申请证书并下载 我是在腾讯云申请的,详见SSL证书
云服务器设置 将下载好的文件解压后导入云服务器里,我这里的系统是Centos 7.6。
1
2
3
4
bindPort = 7000 vhostHTTPSPort = 443 auth.token = "xxxxxxxxxxx"
然后启动即可
本地电脑设置 将下载好的文件解压,并配置frpc.toml文件。
1
2
3
4
5
6
7
8
9
10
11
12
13
14
15
16
17
18
19
serverAddr = "xxx.xxx.xxx.xxx" #公网ip serverPort = 7000 auth.token = "xxxxxxxxxxx" #与frps.toml的auth.token一致 [[proxies]] name = "test_htts2http" type = "https" customDomains = ["www.xxxx.com"] #购买的域名 [proxies.plugin] type = "https2http" localAddr = "127.0.0.1:4000" crtPath = "./xxx.crt" #放crt文件 keyPath = "./xxx.key" #放key文件 hostHeaderRewrite = "127.0.0.1" requestHeaders.set.x-from-where = "frp"
然后CMD启动即可
nginx设置 nginx我是用命令行安装的,安装好后需要编辑nginx.conf
1 $ vim /etc/nginx/nginx.conf
然后更改为
1
2
3
4
5
6
7
8
9
10
11
12
13
14
15
16
17
18
19
20
21
22
23
24
25
26
27
28
29
30
31
32
33
34
35
36
37
38
39
40
41
42
43
44
45
46
47
48
49
50
51
52
53
54
55
56
57
58
59
60
61
user nginx; worker_processes auto; error_log /var/log/nginx/error.log; pid /run/nginx.pid; # Load dynamic modules. See /usr/share/doc/nginx/README.dynamic. include /usr/share/nginx/modules/*.conf; events { worker_connections 1024; } http { log_format main '$remote_addr - $remote_user [$time_local] "$request" ' '$status $body_bytes_sent "$http_referer" ' '"$http_user_agent" "$http_x_forwarded_for"'; access_log /var/log/nginx/access.log main; sendfile on; tcp_nopush on; tcp_nodelay on; keepalive_timeout 65; types_hash_max_size 4096; include /etc/nginx/mime.types; default_type application/octet-stream; # Load modular configuration files from the /etc/nginx/conf.d directory. # See http://nginx.org/en/docs/ngx_core_module.html#include # for more information. include /etc/nginx/conf.d/*.conf; server { listen 443 ssl http2; listen [::]:443 ssl http2; ssl_certificate "/etc/nginxxxxxxx.com_bundle.crt"; ssl_certificate_key "/etc/nginx/xxxxxx.com.key"; ssl_protocols TLSv1.2 TLSv1.3; ssl_ciphers HIGH:!aNULL:!MD5; ssl_prefer_server_ciphers on; server_name www.xxxxxx.com xxxxxx.com; return 301 https://$server_name; root html; # Load configuration files for the default server block. include /etc/nginx/default.d/*.conf; error_page 404 /404.html; location = /404.html { } error_page 500 502 503 504 /50x.html; location = /50x.html { } } }
其中,ssl_certificate 需要放crt文件,ssl_certificate_key 需要放key文件。www.xxxxxx.com xxxxxx.com 。
最后,重启nginx后,在浏览器输入你的域名或者ip地址就可以https的方式访问你的网址了。
